🧬 Perfect Laboratory Information System – Complete User Guide
The Perfect Laboratory Management System by Saru Tech digitizes and manages the entire laboratory workflow. From creating lab requests to delivering validated reports, this system empowers all staff — nurses, phlebotomists, lab technicians, billing officers, and administrators — to work efficiently and accurately.
🗂️ Quick Overview of Laboratory Menu Tabs
Here is a comprehensive list of all tabs and pages in the system. These tabs allow you to access every workflow and administrative feature:
| Icon | Page Name | Purpose |
|---|---|---|
| 👤 | Patients | View and manage all patient records. |
| 📄 | All Requests | See and manage all laboratory test requests. |
| 💳 | Income & Service Billing | Track all payments, manage refunds, and view income summaries. |
| 🧪 | Tests | Add or edit available laboratory test types. |
| 🧫 | Specimen Collection | Record specimen collection details from patients. |
| 🏥 | Specimen Reception | Log specimens received in the laboratory for processing. |
| 📄 | Templates | Store reusable standard phrases for reports. |
| 📦 | Inventory Management | Track consumables and lab stock levels. |
| 🔔 | Purchases & Stock Alert | Manage purchase orders and receive stock alerts. |
| 🛠️ | Billable Services | Define and manage services that generate revenue. |
| 📆 | Appointments | Schedule and view lab appointments. |
| 💰 | Insurance | Track insurance-linked services and claims. |
| 📊 | Reports | Analyze lab performance with dashboards and charts. |
| ✅ | Tasks | Assign and monitor follow-up actions. |
| 🛒 | Point of Sale | Process transactions and issue receipts for lab services. |
| 🔄 | Store to Store Transfers | Move stock between lab stores seamlessly. |
| 📋 | Stock Taking & Audit | Perform audits and reconcile inventory. |
| 🛍️ | Product Sales Management | Track product sales and inventory levels. |
| 📥 | Item Borrowing & Returns | Log borrowed items and track their returns. |
| 📤 | Dispense Management | Manage dispensation of laboratory supplies. |
| ⏳ | Expiring Products | Monitor products nearing expiry dates. |
| 💸 | Expenses | Track operational expenses for the laboratory. |
| 📄 | Invoices & Quotations | Create and send invoices and quotations to clients. |
| 🏢 | Suppliers | Manage supplier details and purchase history. |
📋 Adding a New Laboratory Request
A Laboratory Request is created when a doctor or authorized user orders lab tests for a patient. This can be done from:
- 🖥️ The Perfect Patient Management System (if integrated)
- 🏥 The Perfect Hospital Ward Management System (if integrated)
- 🔘 Or directly from the Laboratory Module by clicking the + button beside the search bar.
Once you initiate a new request, follow these steps to ensure all patient and test details are correctly entered:
🧑⚕️ Step 1: Search and Select Patient
Start by searching for an existing patient. Selecting a patient automatically pre-fills their details such as:
- 👤 Name
- 🆔 File Number
- 📞 Phone Number
- 🏠 Address
- ⚧️ Sex
- ❗ Allergies
💡 Tip: If the patient does not already exist, you may need to first create their record in the Patient Management System .
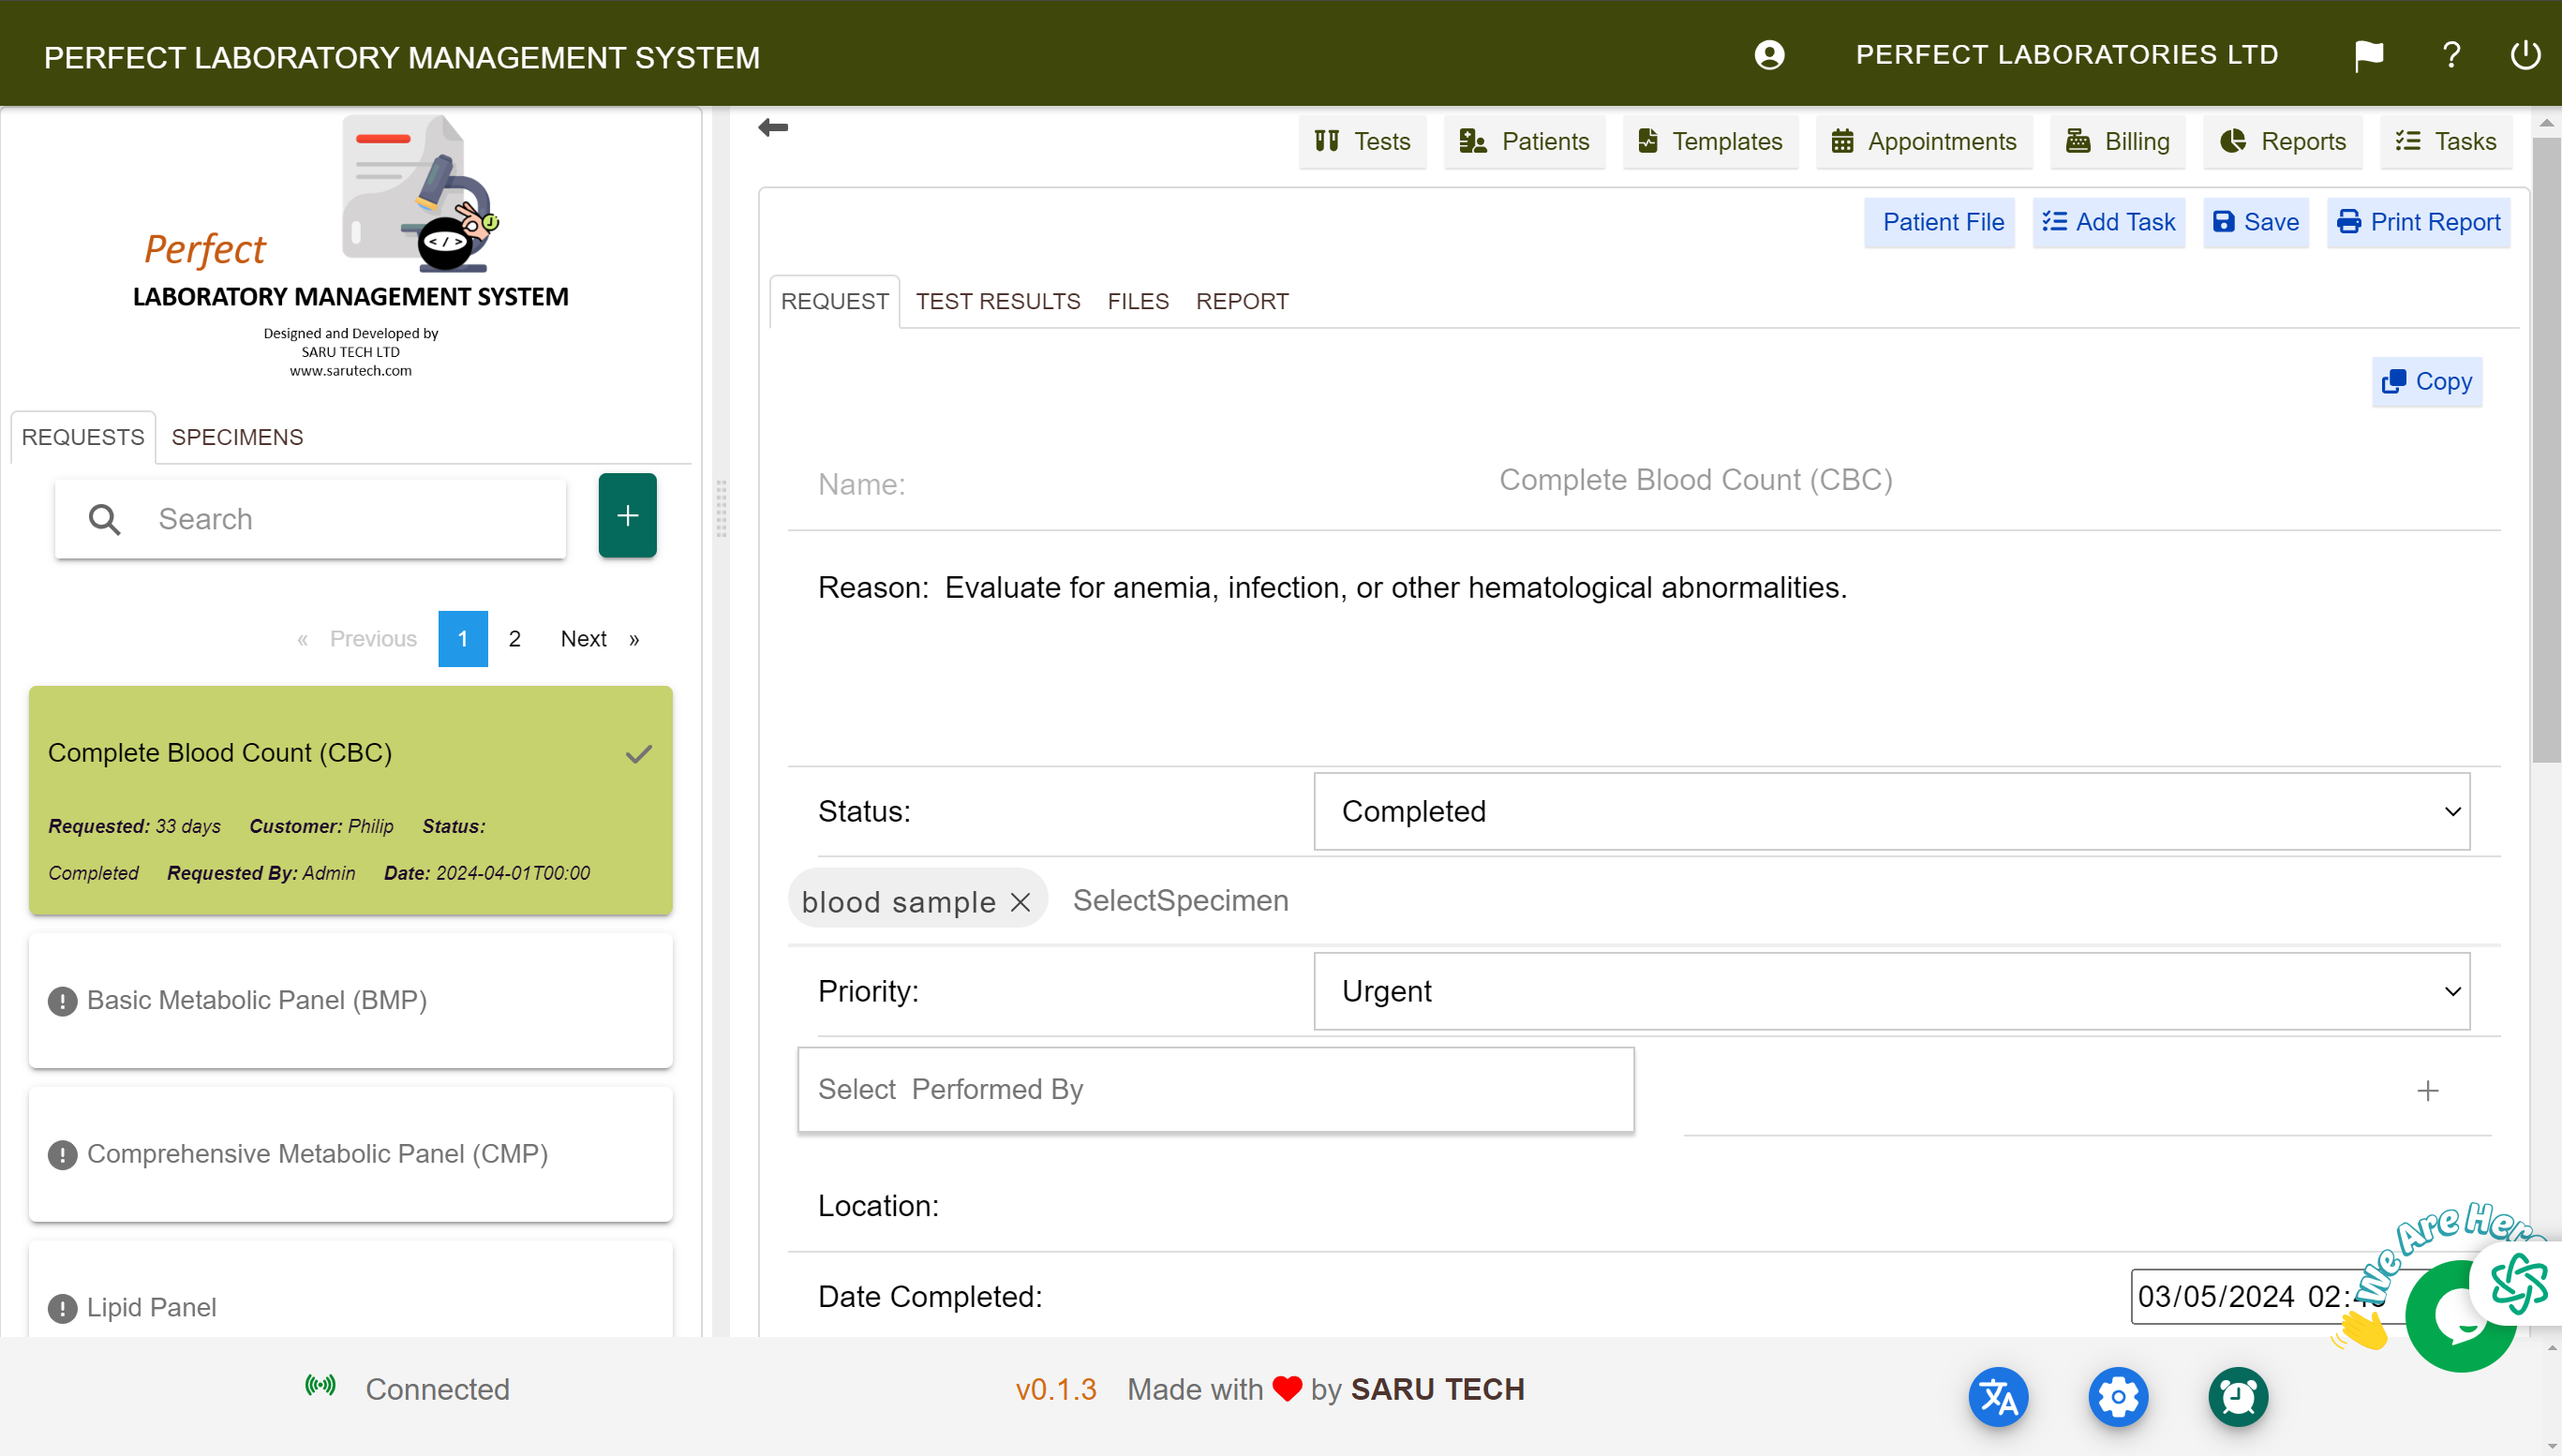
📝 Step 2: Enter Request Details
Fill in the core details for the lab request:
- Request Name: Give the request a descriptive title.
- Reason for Request: Provide the clinical reason for this test.
- Requested By: Select the clinician who made the request.
- Referrer: If referred by an external practice, select the referring practice. This allows you to apply predefined discounts for referrals.
- Status: Set the initial status for the request.
- Results Unit: Choose the units for reporting results (e.g., SI or Conventional).
- Priority: Define the urgency of the request (e.g., Urgent, High, Medium, Low).
🧪 Step 3: Add Tests
Navigate to the Tests Tab to search and add individual tests or panels to the laboratory request. The system comes preloaded with over 300 standard tests , but you can easily create new ones if needed.
🔬 Single Tests vs Panels
✅ Single Tests are standalone diagnostic procedures, such as Glucose , WBC Count , or HIV Antibody Test . ✅ Panels are collections of related tests grouped for convenience. For example, a Liver Function Panel might include ALT, AST, and Bilirubin.
Panels are useful when multiple tests are typically ordered together, saving time and ensuring consistent pricing.
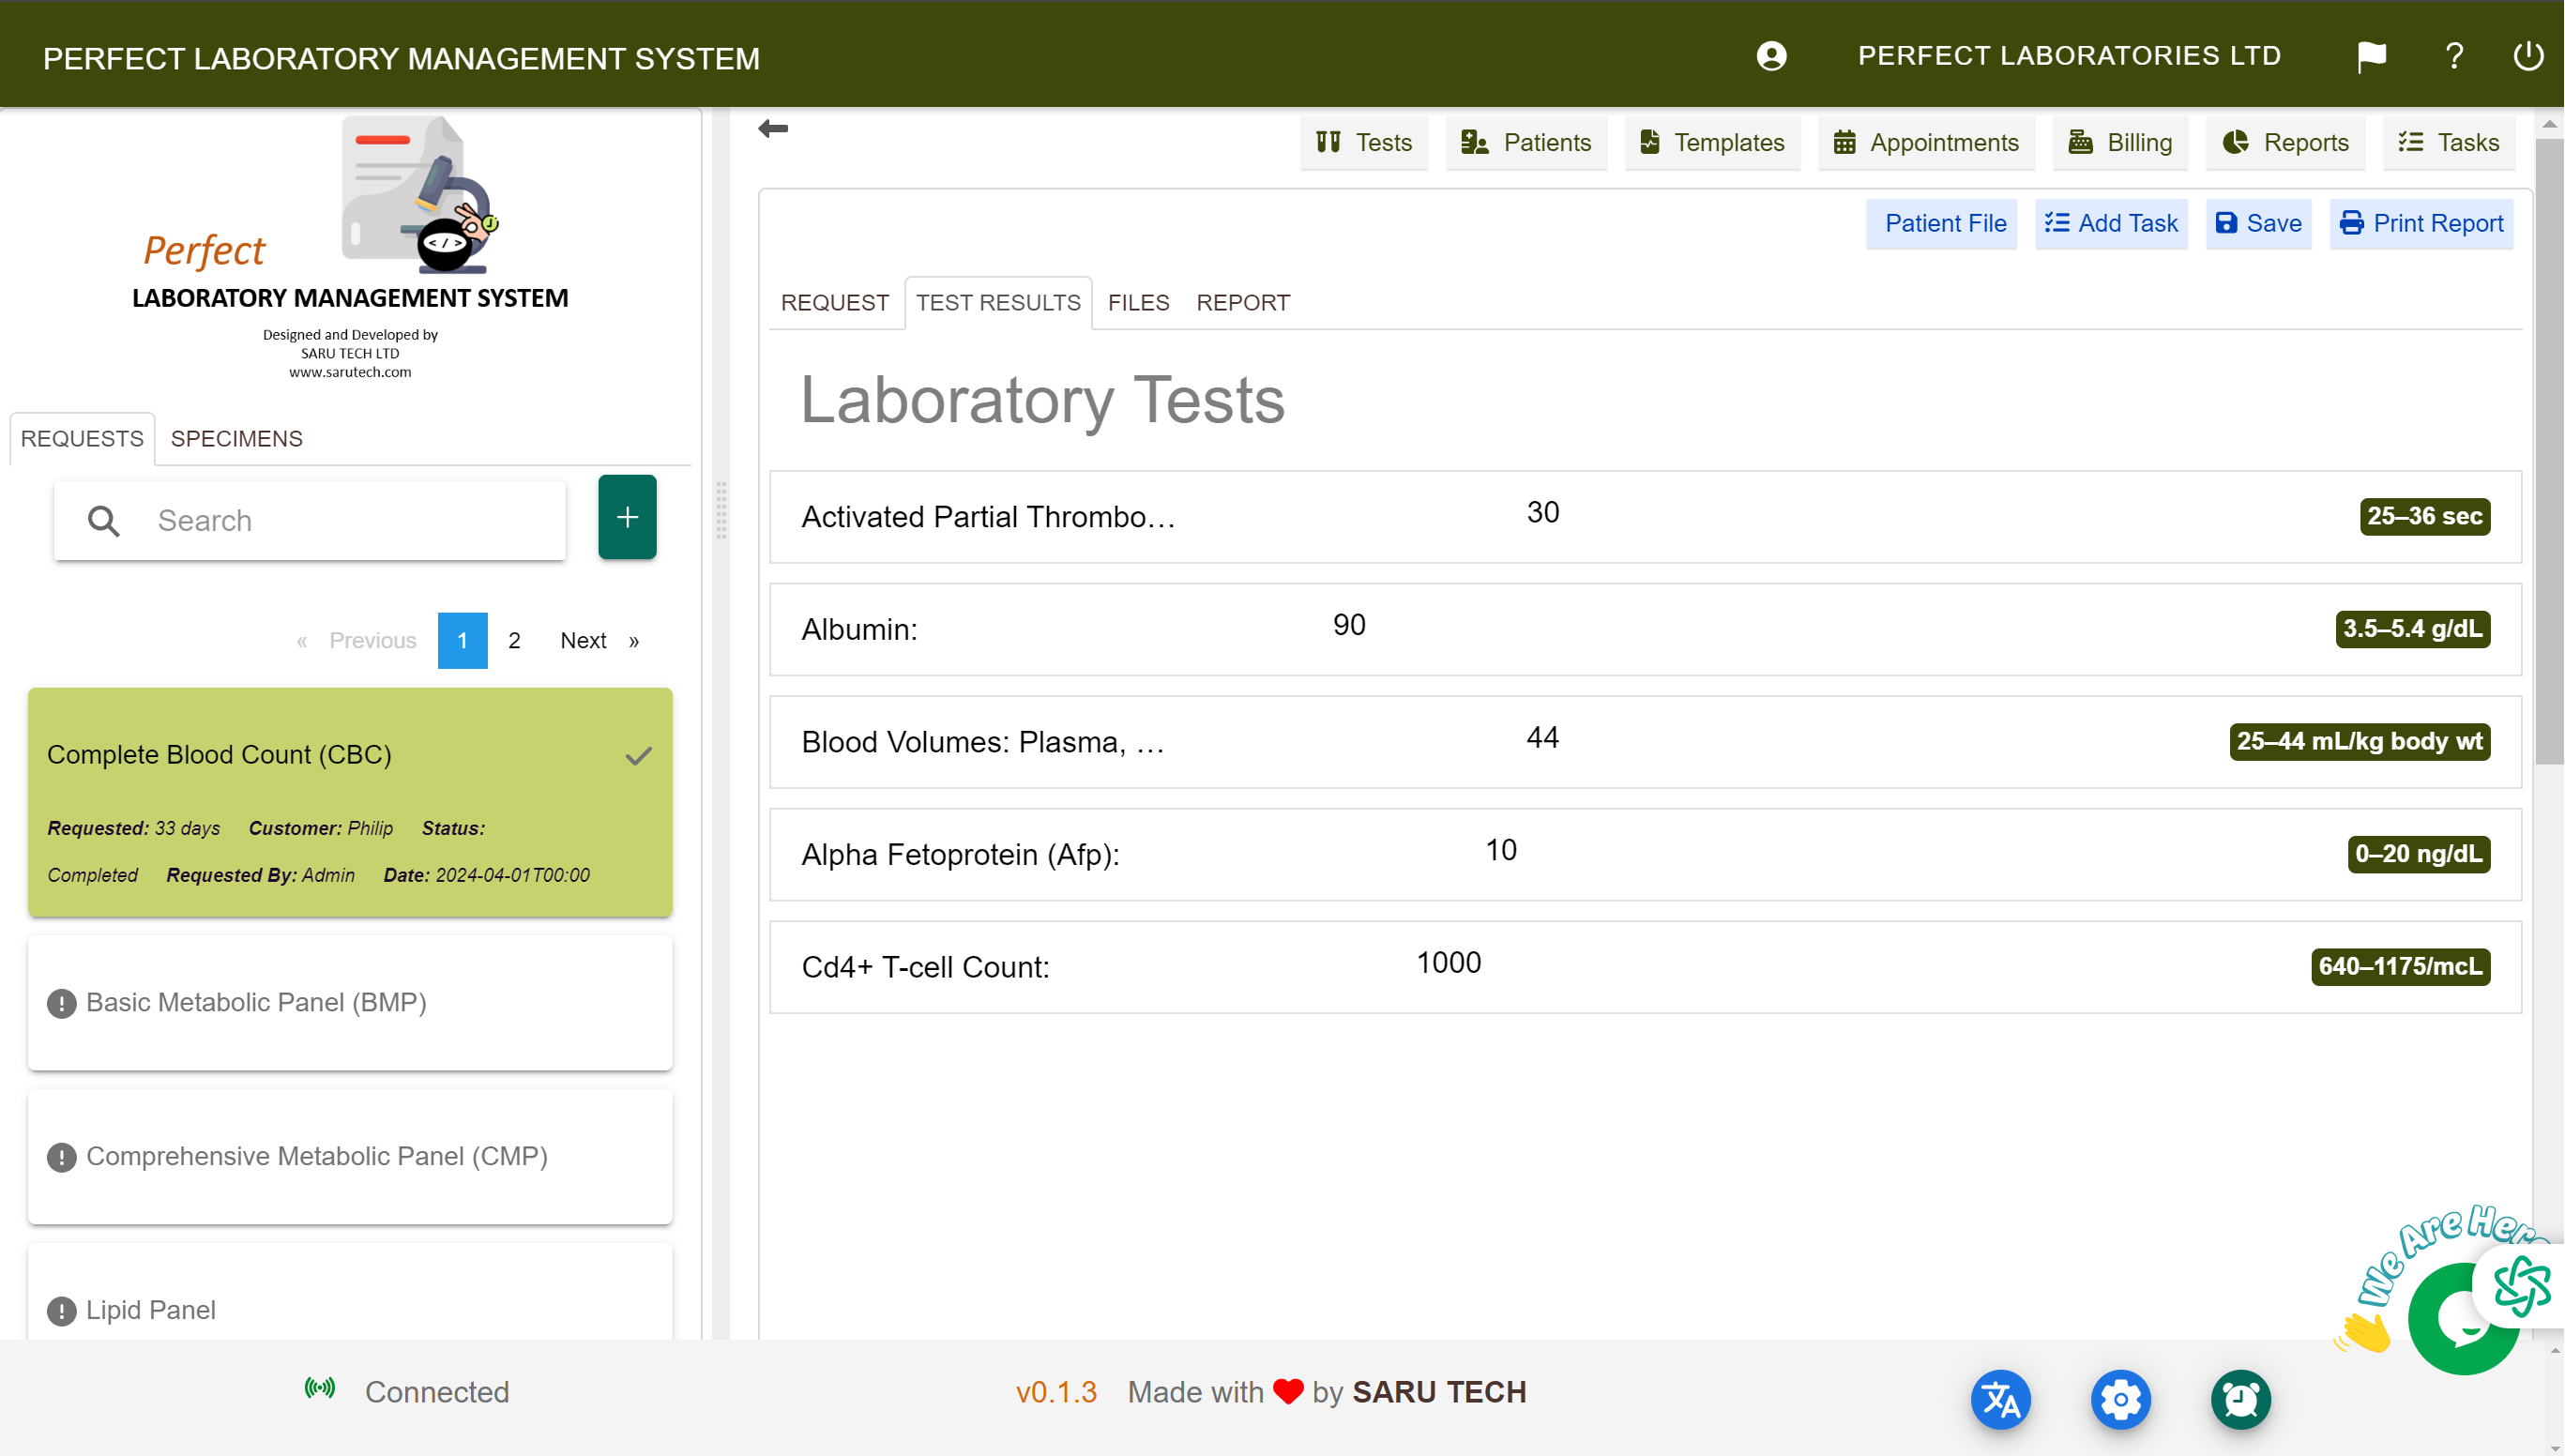
📏 Units and Normal Ranges
As you add tests, the system displays:
- 📐 Recorded Unit: Default unit for the test (e.g., mg/dL, mmol/L).
- 📊 Normal Range: Reference range for detecting abnormal values.
- 🔄 Unit Switching: Toggle between SI-Units and Conventional Units for reporting.
If a test is added by mistake or no longer needed, you can easily remove it using the Delete button beside the test name.
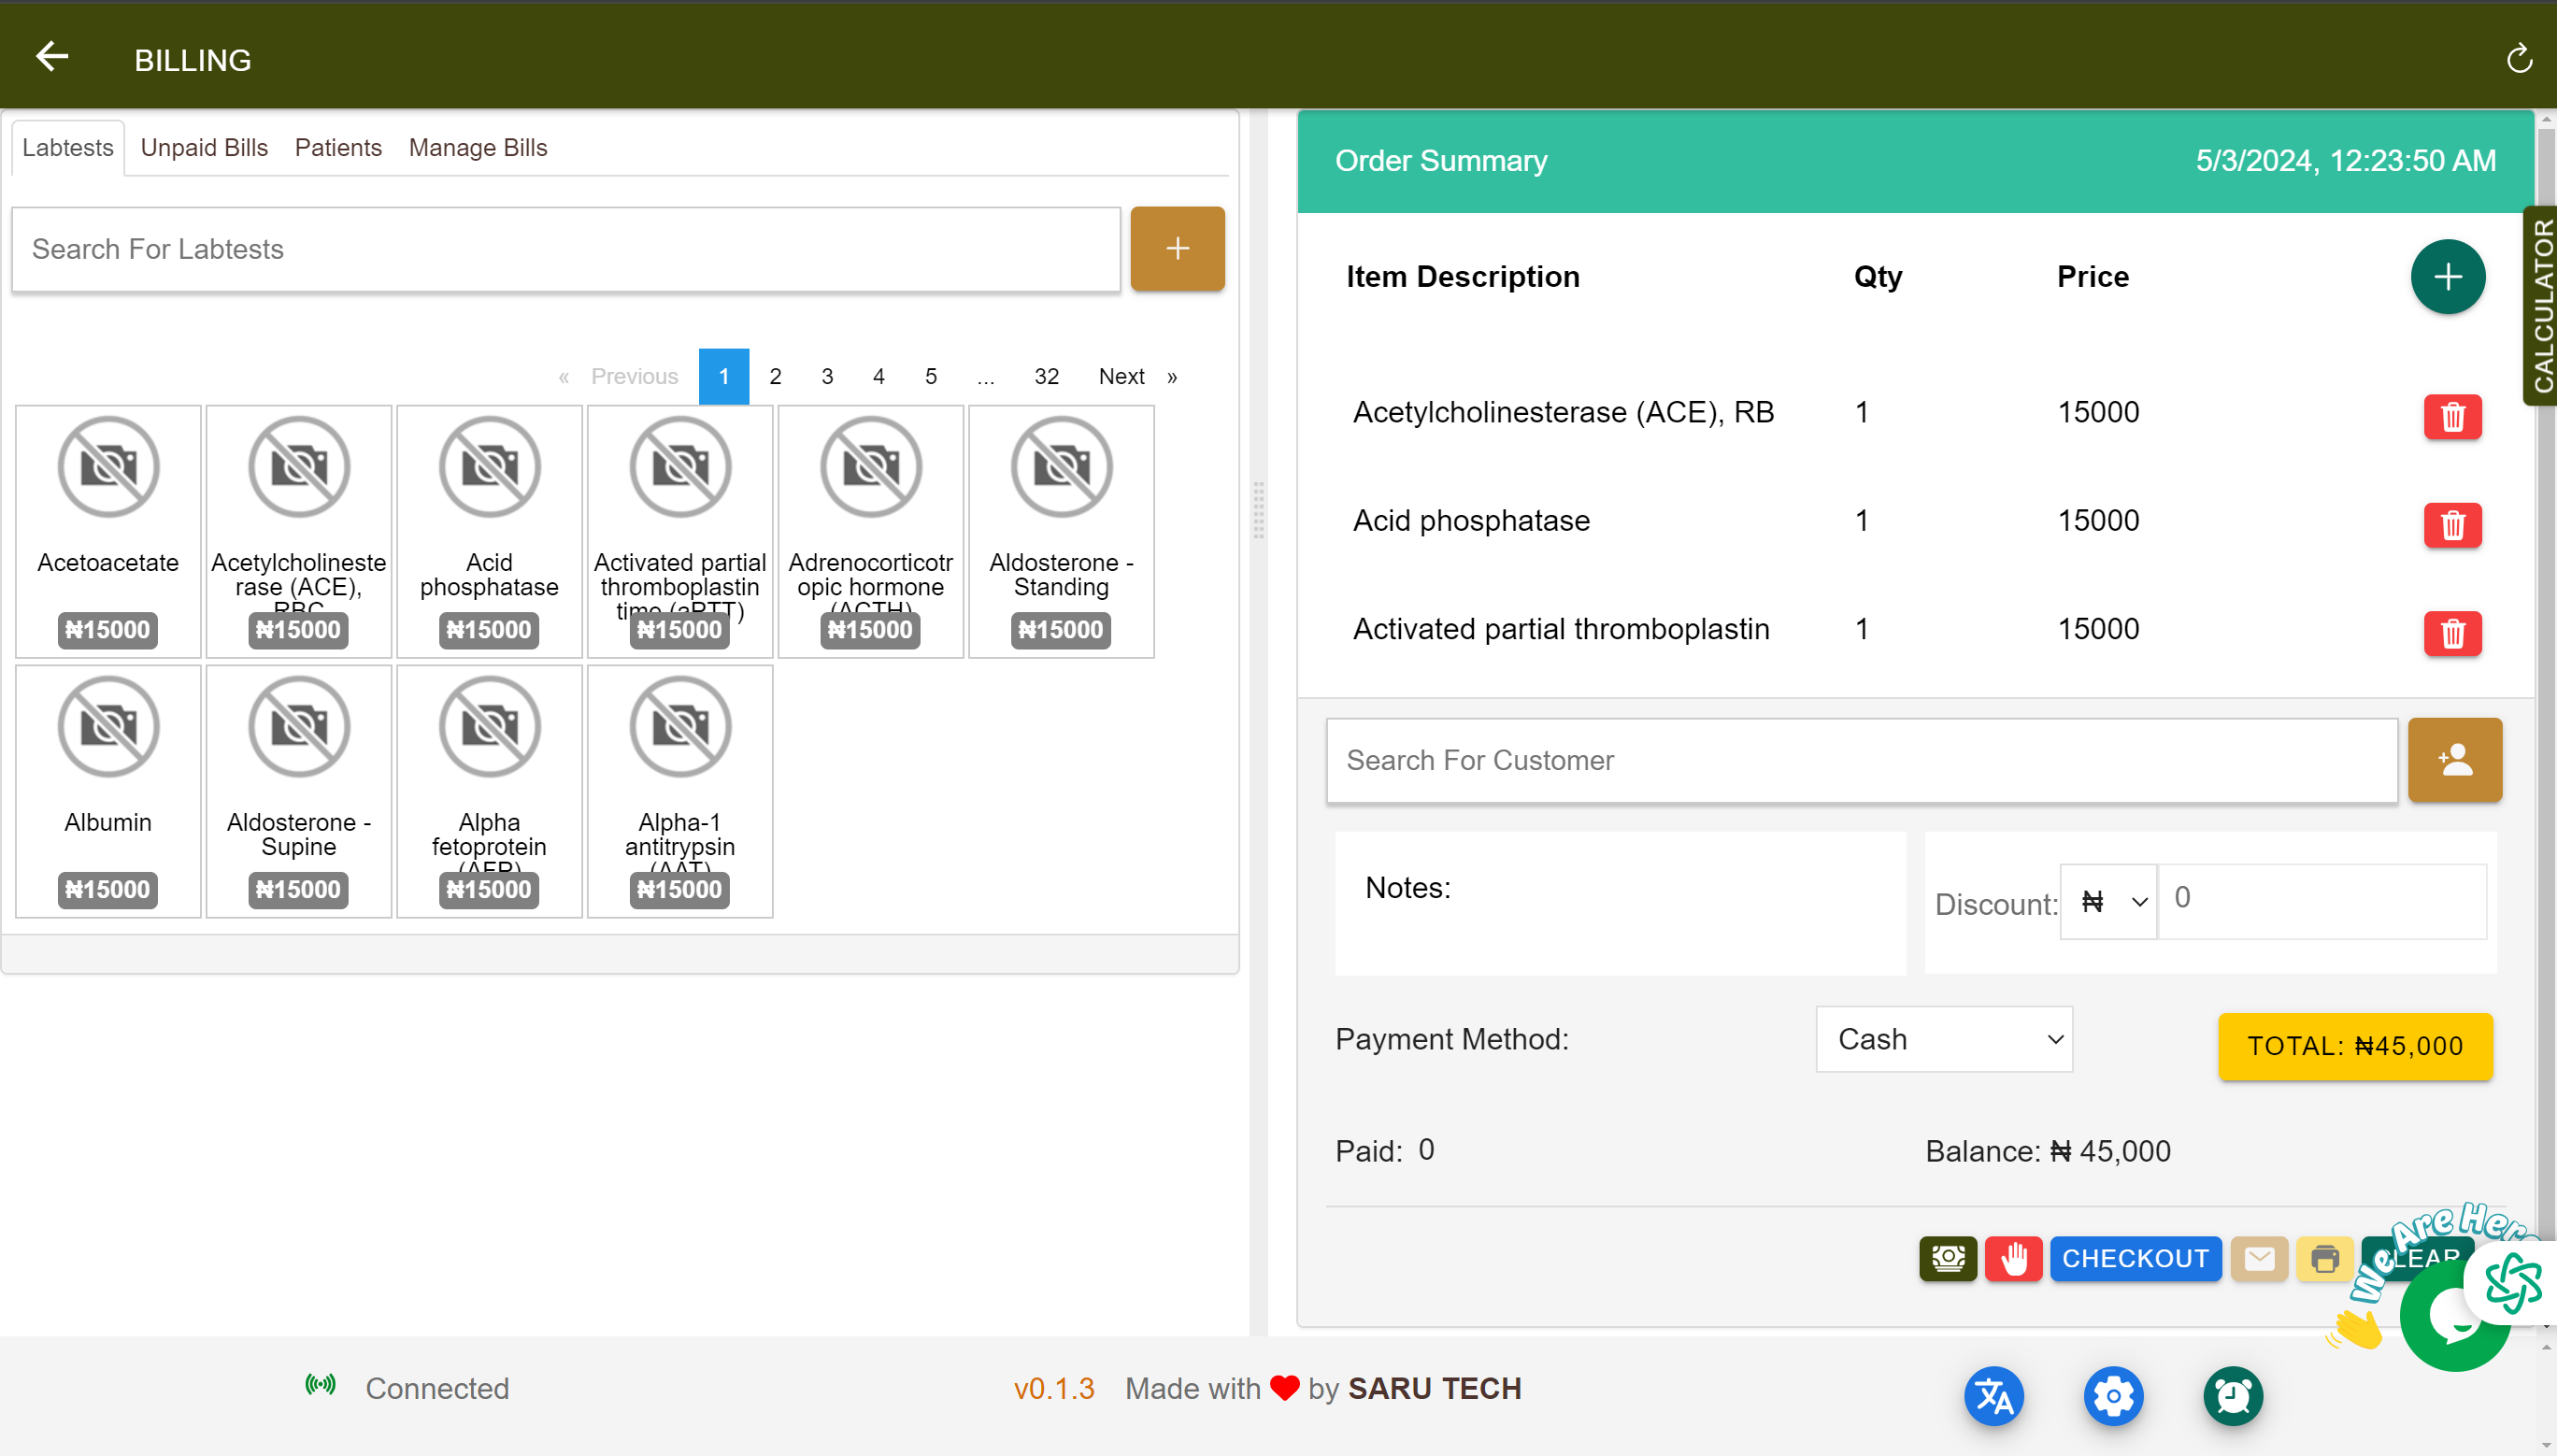
💳 Billing and Payment Management
As tests are added, their individual costs are automatically calculated and added to the patient's bill. At the top of the screen, you’ll see:
- 💲 Total Cost: The cumulative cost of all tests and services.
- 💳 Balance Payment: The amount due after applying any discounts or insurance adjustments.
📉 Discounts and Adjustments
The system automatically applies configured discounts or taxes when appropriate:
- 📊 Tax (if configured)
- 💸 Discounts (from referrer or patient type)
🔓 Who Can Apply Discounts?
Only users with the correct billing permissions can apply discounts manually.
✅ Types of Discounts:
| Type | How It’s Applied |
|---|---|
| 🏥 Referrer Discount | Applied automatically based on the doctor or clinic who referred the patient. |
| 🩺 Insurance Coverage | Entered manually or pulled from the patient’s insurance profile. |
| 💵 Manual Discount | Added directly by the billing officer (e.g., 10% off total). |
💸 Managing Payments
The system supports multiple payment methods, including:
- 💵 Cash
- 💳 Credit/Debit Cards
- 🏦 Bank Transfer
- 🖥️ Direct integration with Square Terminal for card payments
📜 Automatic Payment History
The system automatically records:
- 🕒 When payments were made
- 👤 Who processed each payment
- 🔄 Refunds: When payments were returned and by whom
This comprehensive billing panel ensures financial tracking without manual effort. Receipts can be printed or emailed directly to the patient.
🩸 Step 4: Add Specimens (Optional)
You can add specimens directly at this stage. However, most organizations use the dedicated specimen management pages:
- 🔗 Specimen Collection Page : For phlebotomy staff to manage collection.
- 🔗 Specimen Reception Page : For lab staff to confirm specimen receipt.
⚠️ Best Practice: Let the respective teams manage these steps in their dedicated UIs for better workflow separation.
💾 Step 5: Save the Request
Once you’ve added all necessary details, click the button to finalize the creation.
📂 Managing and Viewing Requests
Once saved, you’ll see the new request appear in the left sidebar under the appropriate tab based on its status:
- 🟦 Pending: New requests awaiting specimen collection.
- 🟫 Specimen Received: Samples collected and received in the lab.
- 🟧 In Progress: Tests in process or under review.
- 🟩 Completed: Finalized reports ready for billing and communication.
You can also view and search historical lab requests by clicking the All Requests Tab to retrieve past records.
💡 Tip: Requests are color-coded by priority (e.g., Urgent = red icon).
🗂️ Understanding the Status Tabs and Workflow Grouping
The Laboratory Request interface organizes all test requests into four main tabs . These tabs group requests based on their workflow stage, helping staff quickly focus on the tasks relevant to their role:
| Tab | Included Statuses |
|---|---|
| 🟦 Pending | Test Ordered, Specimen Taken |
| 🟫 Specimen Received | Specimen Received, Outsourced Received |
| 🟧 In Progress | Sent to Machine, Result Entered, Result Checked, Result Rejected |
| 🟩 Completed | Result Approved, Completed |
🔄 Why This Grouping Matters
These tabs make it easier for different team members to work efficiently. Here’s how each group works:
🟦 Pending Tab
- Who uses it: Nurses, Receptionists, Phlebotomists
- Purpose: Requests waiting for specimen collection.
- Statuses: Test Ordered, Specimen Taken
🟫 Specimen Received Tab
- Who uses it: Lab Technicians
- Purpose: Confirms that specimens are now physically in the lab.
- Statuses: Specimen Received, Outsourced Received
🟧 In Progress Tab
- Who uses it: Lab Analysts, Diagnostic Staff
- Purpose: View requests undergoing testing or verification.
- Statuses: Sent to Machine, Result Entered, Result Checked, Result Rejected
🟩 Completed Tab
- Who uses it: Lab Supervisors, Billing Staff
- Purpose: Shows finalized reports ready for printing, communication, or billing.
- Statuses: Result Approved, Completed
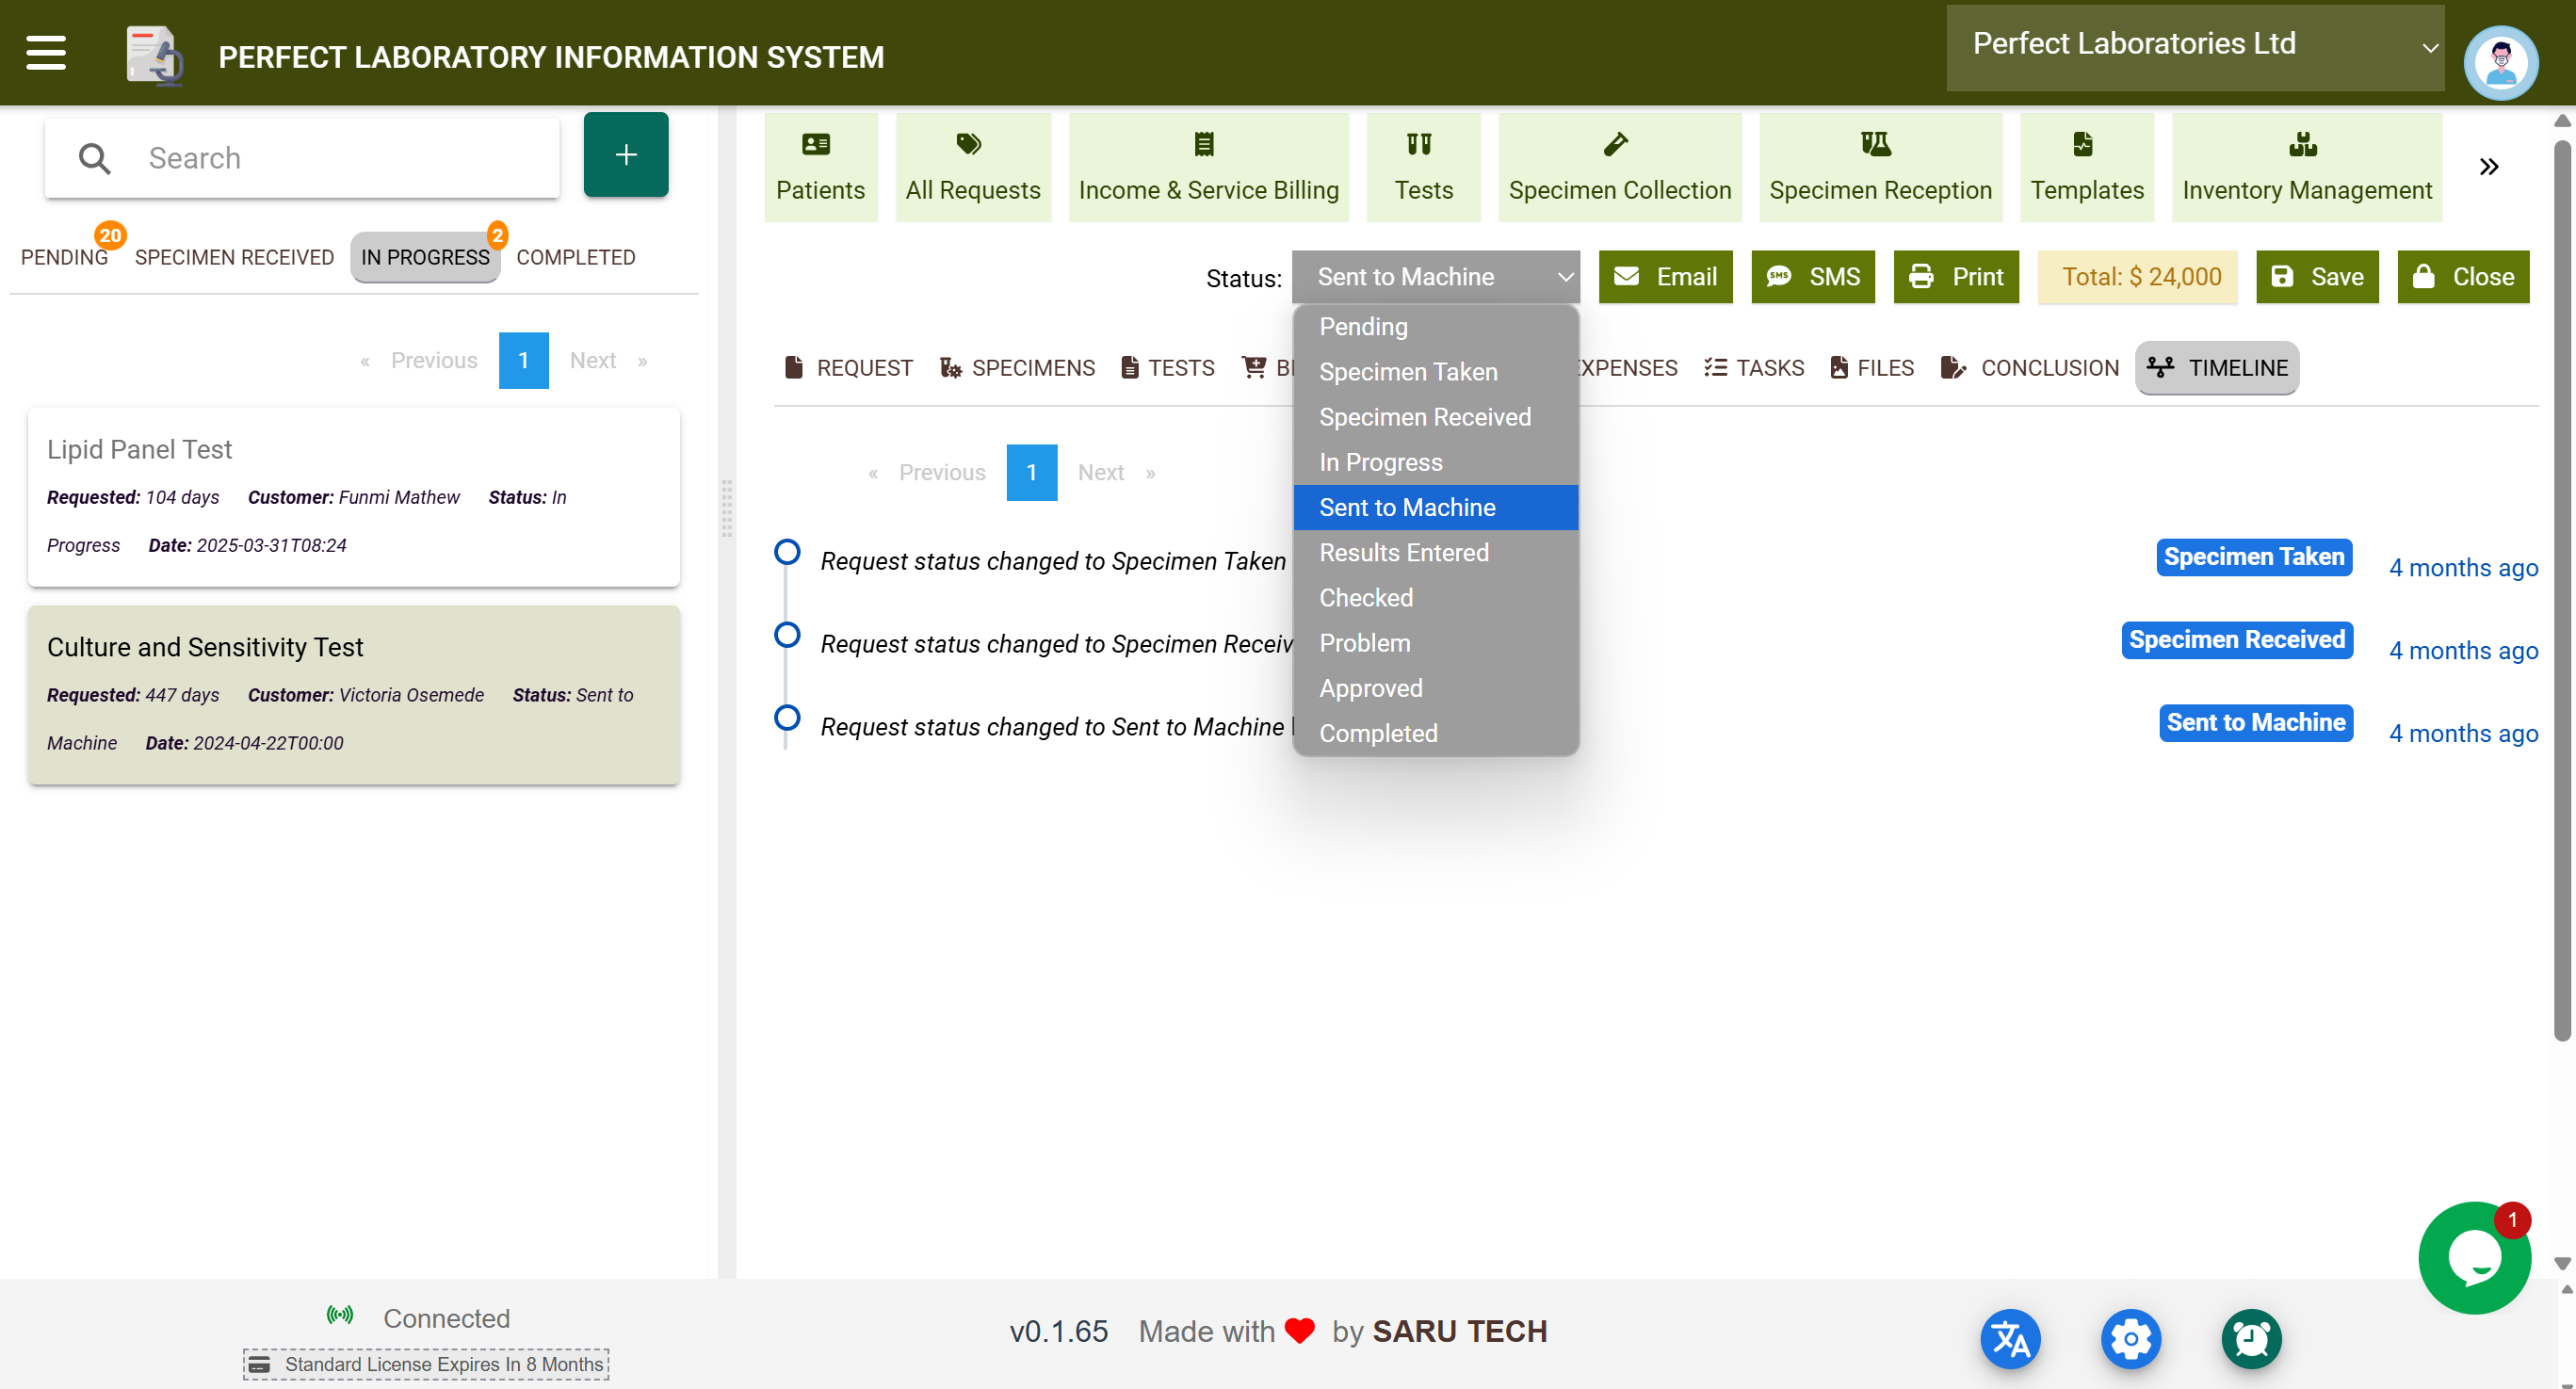
🔁 Summary of All Request Statuses
Here’s a master list of all statuses and their meanings in the laboratory workflow:
| Status | Description |
|---|---|
| Test Ordered | Request created; no sample collected yet. |
| Specimen Taken | Sample collected but not yet delivered to the lab. |
| Specimen Received | Sample received at the laboratory. |
| Outsourced Received | Result received from an external provider. |
| Sent to Machine | Sample sent to lab equipment for testing. |
| Result Entered | Results manually or automatically entered. |
| Result Checked | Initial review by lab technician. |
| Result Rejected | Results deemed invalid/incomplete and rejected. |
| Result Approved | Final validation completed. |
| Completed | Request fully closed and archived. |
| Cancelled | Request cancelled due to error, duplication, or change of plan. |